The challenge for this week was a colour challenge using the colours mentioned above, and right off the bat I knew which DSP I was using the Frosted Florals have them most stunning Mint Macaron Designed Paper
and it is the bottom one I immediately decided to go with and then I needed to build a card around that x
I chose the blackberry bliss as my secondary colour as it is bold and makes a loud statement so it married perfectly with the subtle and subdued Mint Macaron obviously both these colours feature in the Frosted Florals DSP collection so that was where I decided to go and just ass the Grapefruit Grove as an accent colour.
Im happy how it turned out and hope that it inspires you to have a go at these challenges and stretch your crafty imagination a little bit more.
a bit of a longer video as I didnt have a card designed I was doing it on camera x
These are the bundle we are working with today and I think you will agree they are amazing, the thinlit die for being just one die cuts out beautiful snowflakes that you can use to create multiple cards which I love being able to maximize the use of our supplies which is what this series is all about using your supplies to get the most out of it and not sat on a shelf gathering dust.
These two cards I created prior to releasing the show me 5!!! series but you can see how simplistic yet beautiful they are.
This card is my standard a6 card base and I have used gold foil paper
as the die is smaller than my card I chose to add the extra 2 strips at the top and bottom and them mount my card on dimensionals to give it a little interest, I then added out Gold 1/8"mm Cord, I wrapped the cord around once and tied a simple box knot then used the sentiment Thinking of you with Love I stamped it on a scrap piece of whisper white with Versamark and used Gold embossing powder to match the colours used on the card.
I love the luxurious feel of this card it is very decadent.
This is another standard a6 card base
my merry merlot card layer is 14.3cm x 10cm
the Whisper White Stamping layer is 13.8cm x 9.5cm
I then used merry merlot ink pad and stamped randomly using the small snowflake stamp in the set
I got a scrap bit of whisper white and stamped the sentiment in merry merlot and then adhered it to a merry merlot scrap and trimmed a fine border by eye.
I did actually stop at that point and was about to add my rhinestones when a scrap strip of merry merlot glimmer paper fell on to my card and it went so well on it I decided to add some strips in different thicknesses to give it another texture to it, I then added tons of rhinestones to all the larger stamped snowflakes on the card.
This one was just lovely to make x
I used my standard a6 card base and then cut a stamping layer to 14.3cm x 10cm
I took the snowflake stamp and again randomly stamped on one half using versamark (I find it easier doing full cards of embossing in 2 sections)
I added my gold embossing powder and heated it to melt the powder
I then repeated this for the other half.
The spaces in between I took a piece of gold foil paper and backed it with out multipurpose adhesive sheet then using the blizzard thinlit I die cut out lots of snowflakes that are now stickers (yeay)
I then added on some inbetween the embossing and the two different gold tones add so much interest its perfect.
The sentiment I stamped with versamark and added the gold embossing powder and heated it. onve cooled I added it to some gold foil paper and added dimensionals to the back.
I then used the gold 1/8" cord and wrapped it round 3 times to give it a wide strip and then added the sentiment over it and finally adhered the stamping layer to my card base x
This one is an absolute novice stampers dream card, you could create this easily and be so proud at creating this all on your own.
Standard a6 card base.
Silver foil paper cut to 14.3cm x 10cm
Night of Navy cardstock cut down to 13.8cm x 9.5cm
I thenn took some silver foil paper and cut it with the blizzard die to give me lots of silver foil snowflakes.
I then adhered them using a 2 way glue pen which I find is easier for me.
I then stamped with versamark the sentiment which is actually from the making christmas bright set but... I think the shine word makes it work perfectly with these stars.
I heat embossed it with silver embossing powder and then fussy cut around it and then popped it up on dimensionals and finished it off with a scatter of silver sequins from our metallic sequins and some clear rhinestones.
This one has the similar steps as the gold one at the top, I die cut the blizzard
which as mentioned previously is shorter than my card base so had to add in two strips of merry merlot glimmer paper but the join just looked terrible so had to rectify it ( us crafters always work around problems) so I took two thin strips of whisper white and stamped with with the snowflake stamp using merry merlot inkpad and then adhered them over the joins at the top and the bottom and think it makes a big difference to the card.
I then added the sentiment using merry merlot ink on whisper white cardstock, mounted it on a merry merlot cardstock and trimmed it to give me a thin border, I then added the copper & merry merlot ribbon using the merry merlot size facing up and added the sentiment on dimensionals over the ribbon to finish it off.
this card was literally using the scraps from the card above, I used the snowflakes from the card above to create this card I used my standard a6 and a stamping layer in whisper white cut down to 14.3cm x 10cm
I cut a strip of whisper white measuring 10cm x 1cm and stamped the sentiment using merry merlot ink pad, I then cut a strip of merry merlot glimmer paper measuring 2cm x 10cm so I had a nice border top and bottom of my sentiment.
I then adhered the stamping layer to my card base.
I then took the glimmer paper snowflakes and positioned them where I liked and once happy using a two way glue pen I stuck them into position. with of course some rhinestones to finish it off.
This one took me a while as I just couldnt get the background how I wanted (envisaged) it to look.
I used my standard card base a6
Cut my merry merlot cardstock layer down to 14.3cm x 10cm
The stamping layer was shimmer white cardstock and cut that down to 13.8cm x 9.5cm
Using gray granite 2nd generation (I stamped off the first layer so the stamp used for my card was lighter colour wise) the stamp I used was the large splodge textured image but it was still too dark so I got my perfect pearl shimmer spray ( home made using perfect pearls pearl colour, water and 2/3 drops of glycerin into a clean spray bottle drop in a few glass or porcelain beads so you can agitate the pearls before spraying or in my case brushing) I poured some into the lid of my spray bottle and using a brush I saturated the stamping layer as the ink is water based it lifted a lot of the colour and allowed me to manipulate the colour where I wanted it. the bonus was it is super shimmered now.
I then using the snowflake stamp added randomly over the stamping layer using gray granite ink full strength.
Then I added the copper and merry merlot ribbon with the merry merlot facing up
I stamped the sentiment using merry merlot ink on top white shimmer cardstock and die cut it using my layering squares dies. I then took the next size up in the scalloped edge and cut that from merry merlot cardstock, adhered them together and using dimensionals I added them over the ribbon.
I lastly took my clear rhinestones and As I dont have the merry merlot blend pen, I chose the dark blackberry bliss blend and coloured some of my clear rhinestones to make them a similar tone to the merry merlot and it worked perfectly.
This is the card I done of film the card is actually very simple
standard card base a6
night of navy layer - 14.3cm x 10cm
stamping layer is 13.8cm x 9.5cm
I used Balmy blue inkpad
I stamped the large splodge texture image three times across the card I stamped off to give a second generation (lighter colour) impression.
I then used the flourish stamp using balmy blue full strength across the card in a slanted up pattern, I then took the small spotted stamp and using second generation balmy blue stamped in the blank areas of white.
I stamped the sentiment using night of navy ink and trimmed it to the size of the sentiment then adhered it on to night of navy cardstock and using my eyes trimmed it to leave a border around the sentiment, I then added night of navy gingham ribbon to the stamping layer and adhered down the layers together, finally I added the sentiment over the ribbon and added on 3 rhinestones.
All the instructions step by step are included in the video below
A new feature for me is now going to be show me 5!!
It will feature a bundle or just a stamp set
and I will show you 5 projects using the set
and if I have made any other projects using it previously I will also add them to the blog post.
My main aim in doing this is to make sure you are getting value for money from all your Stampin' Up! Stamps and to show you they are an investment.
So the set we are focusing on today is one of my personal favorites from the main annual catalogue
and that is Follow your Dreams and Chase your Dreams Framelits
A lovely set that has 7 Red Rubber Clear mount stamps and 8 Dies
This card I used 3 colours on Shimmer white cardstock for the background
Balmy Blue, Coastal Cabana and Bermuda Bay
I then stamped the little flower randomly on it using Blueberry Bushel, 2nd Generation ( stamped the full strength off on scrap first then on to the background so it wasnt so vibrant, I used a stamp from another bundle called Beautiful Blizzard to add some Blueberry Bushel behind my focal image.
I stamped the dreamcatcher stamp with Blueberry Bushel and die cut that out and adhered it to my card over the Blueberry Bushel area of my card. Then I layered up some of the die cuts in silver foil paper and used some of the tassels from the small dream catcher die to the larger decorative piece to give it that dream catcher feel I then added the 2 larger feathers either side behind the small tassels to give you the illusion of depth. Finally I die cut the word Dream from some shimmer white card stock.
To add a little bit of sparkle I did add a rhinestones and some tiny sequins from out Metallic sequins.
This one I chose the script DSP from Share what you love DSP, that was my first choice so I worked around those colours to make the card and the colours are Grapefruit Grove and Basic Black that is it.
I mounted my DSP on to Basic Black Cardstock and then added some of our NEW gorgeous Glittered Organza ribbon (I do love this ribbon)
I picked up a bit of shimmer white cardstock and watercoloured some Grapefruit Grove on to it ( I did try the Grapefruit Grove cardstock but it was to dark and didnt work for this card)
I then stamped the dreamcatcher and the sentiment I due cut the dreamcatcher and fussy cut around the sentiment, I backed both on to Basic Black Cardstock and fussy cut around them both to give a thin border around them,
To Decorate I used the Faceted Dots from the Annual Catalogue, they come in 4 colours, Basic Black, Blackberry Bliss, Grapefruit Grove and Min Macaron.
I used the largest sized in the center of the dreamcatcher and several of the smallest ones on the tassels, and then Added all 3 sizes of the Grapefruit Grove to the Ribbon.
This card was another simple watercoloured background using sunset colours,
Daffodil Delight, Pumpkin Pie, and Poppy Parade on shimmer white cardstock, I layered this on to Poppy Parade Cardstock, I stamped the Dreamcatcher on to the cardstock with Poppy Parade, The sentiment I stamped it using my Cherry Cobbler Stampin' Write marker, so I could miss out the word Dreams, I did stamp it directly on my background but it didnt stand out so I restamped it on white shimmer cardstock.
and just cut it out simply and stuck it down with tombow.
I die cut the word Dream also from the shimmer white as I am in love with that paper just now.
I then used our Basic Rhinestones but coloured them with Dark Real Red Stampin' Blends and Dark Mango Melody Stampin' Blends. Lastly I added a tiny hint of xmas red Stickles that I added around the dreamcatcher.
I went a bit nuts with this one but I really like it x the background is using the same three colours as the first card,
Coastal Cabana, Balmy Blue, and Bermuda Bay, I then layered that on to Silver Foil Paper.
I cut into Silver Foil Paper with the larger decorative die circle and then used the plain circle die to cut it out I layered that on to a whisper white cardstock circle and added basic rhinestones to decorate the dreamcatcher.
I added two of the larger feathers in Silver Foil Paper, and then using the tassels from the smaller dreamcatcher die (I snipped them off) I added them dangling down from the dreamcatcher and then using some silver twine I had in my stash I added some extra dangles.
I die cut the word Dreams from the Silver Foil Paper and adhered it to the whisper white scrap and then I fussy cut around it to give it a white border, and then I took one of the die cut tassels to the end of the word Dream and finally I added 3 rhinestones to the background.
Now for out last project
This is what we need to make this project,
Shimmer White Cardstock 14.3cm x 10cm
16cm-17cm of Silver metallic Edge Ribbon
2 Dream Die cuts (One in Basic Black one in Silver Foil Paper)
6 Feathers from shimmer white cardstock
and then 6 colours to colour them using stampin write markers or ink pads and use an acrylic block as your palette as you dont need a lot of ink.
The Colours I chose weew Pineapple Punch, Mint Macaron, Grapefruit Grove, Coastal Cabana, Highland Heather and Flirty Flamingo.and watercoloured the feathers so it was soft and subtle but you could use the colours directly to the feathers if you want a brighter and vibrant look.
I hope this is a good inspiration for you all x
Here is the video tutorial of the last card
Heres another few I have made previously with this bundle
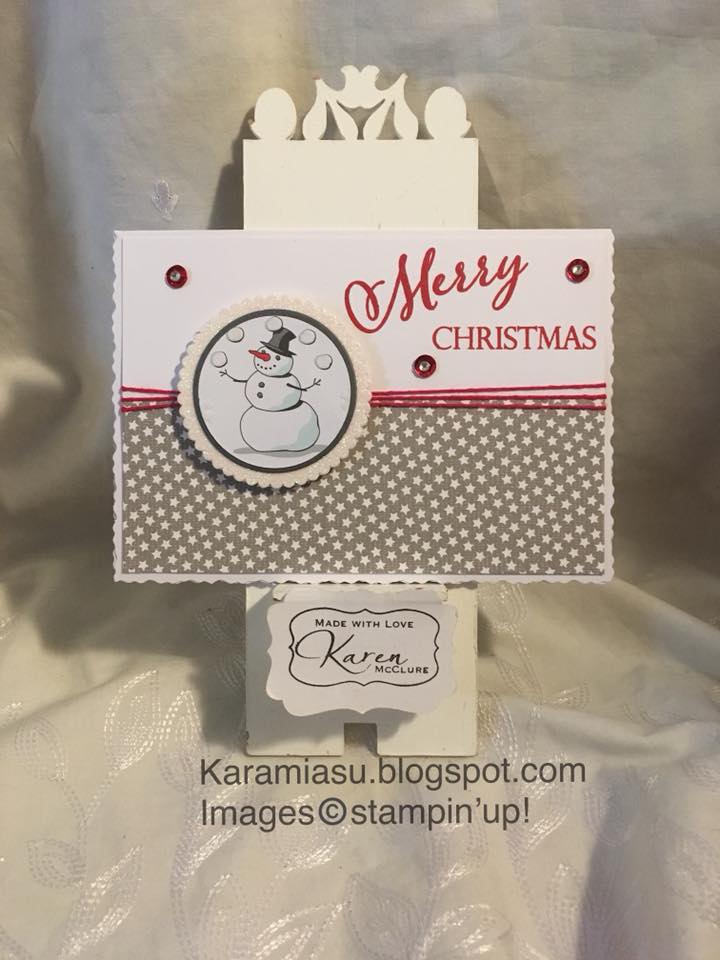
This card started off with my topper literally the snowman and I created the card around him.
I tried (as you will see in the video) the real red behind him but didnt really like it, I much prefer the basic gray it just looks more fitting.
Then added the sparkle glimmer paper.
I then chose the DSP I opted for the Gray Granite with white stars from the Festive Farmhouse DSP,
It fitted well with what I had so far but needed something to bridge that and the whisper white top half so I used the real red bakers twine and I liked that.
Next was the sentiment and I knew the merry christmas to all Photopolymer stamp set was going to be perfect so I chose Script version of Merry and the straight font of Christmas and positioned them on my block to how I wanted them to be.
I practice stamped with the real red and it was perfect.
Stamped on the space I had but it was too high for my liking but nothing I could do it was stamped so I finished it off with some red sequins from my stash.
Now to recreate it better than before
Im sure you will agree it is much better.
so heres how what we need to recreate it
Supplies
a6 Card base
Stamping layer (14.3cm x 10cm)
Festive Farmhouse DSP 5cm x 14.3cm
Cherry Cobbler Double stitched Ribbon or Real Red Bakers Twine
Sparkle Glimmer Paper (check your scraps)
Basic Gray (check your scraps)
Snowman cut from Santa's workshop DSP
Merry Christmas to All Photopolymer Stamp Set
Layering Circles Framelits
Real Red Ink Pad
Sequins and rhinestones to decorate
Method
Layer your festive Farmhouse DSP on to the bottom section of your whisper white stamping layer.
Cut your circles I used 4th smallest straight circle for the Basic Gray and the 5th Smallest for the sparkle glimmer paper.
I then mounted them (topper on to the basic gray, then both of them on to the glimmer paper)
Position your stamps on your card where you feel they will work best then pick them up with your acrylic block once you are happy, ink up the stamps with Real Red and stamp on to your stamping layer.
Add your ribbon or twine to bridge the DSP and the stamping Layer.
Then add dimensionals to your snowman so he will be popped up. and position him where you wish.
Lastly I used 3 red sequins from my own stash and 3 rhinestones in the centre of them to complete my card
I hope you enjoyed this tutorial please have a go at recreating this card, its so simple and really cute.